 UDOO Quad/Dual Documentation
Connecting Via Serial Cable
Overview
Visit our Tutorials section to learn more about: Connecting Via Serial Cable.
UDOO DUAL/QUAD features a built in USB to serial interface which is very useful for various reasons: You can use it to connect UDOO DUAL/QUAD via SSH without a network connection, programming the Sam3x (arduino) and access the debug console for troubleshooting purposes.
Connecting via serial will practically result in a shell console, the same as the one you’ll obtain through SSH connection http://en.wikipedia.org/wiki/Secure_Shell.
Connecting via Serial from Windows
-
Download the serial adapter Driver here: http://www.silabs.com/products/mcu/pages/usbtouartbridgevcpdrivers.aspx
-
Install the proper version for your Operating system: CP210xVCPInstaller_x86.exe for 32-bit systems CP210xVCPInstaller_x64.exe for 64-bit system
-
How to define your Windows version: http://windows.microsoft.com/en-us/windows7/32-bit-and-64-bit-windows-frequently-asked-questions
-
Download and install a software called putty http://www.chiark.greenend.org.uk/~sgtatham/putty/download.html
-
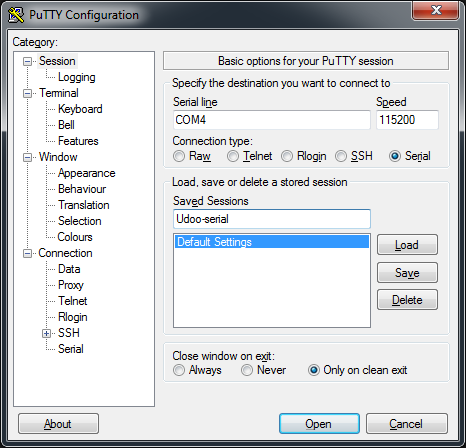
Open putty and configure it as follow: Connection type “serial” Port: “COM3” (please note that this value may be different, check the number of the COM assigned in Windows Device Manager) Speed: “115200” Save it as “Udoo-serial” for future uses.
-
Connect the serial port of UDOO DUAL/QUAD (CN6) to your PC using the micro USB cable.
-
Power up UDOO DUAL/QUAD
-
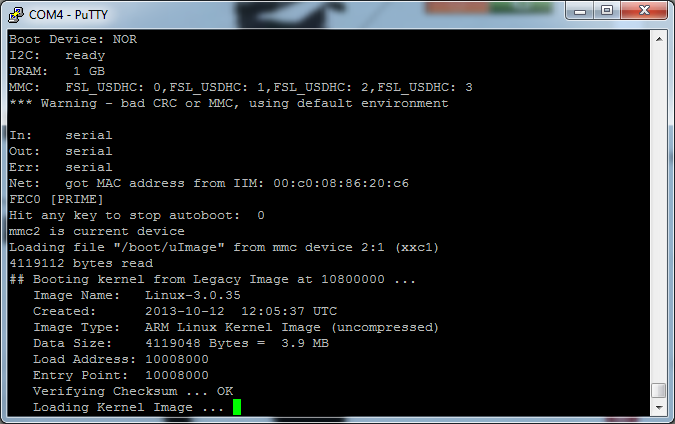
Click Open
-
You’re in! You’ll be able to see the startup process and access to the remote shell console on UDOO DUAL/QUAD.
Connecting via Serial from Linux
-
Connect the serial port of UDOO DUAL/QUAD (CN6) to your PC using the micro USB cable.
-
Type
dmesg
- You should see this line at the end
usb 2-2.1: cp21x converter now attached to tty

- Install minicom:
sudo apt-get update
sudo apt-get install minicom
- Open Minicom and configure it (only the first time) using the following command:
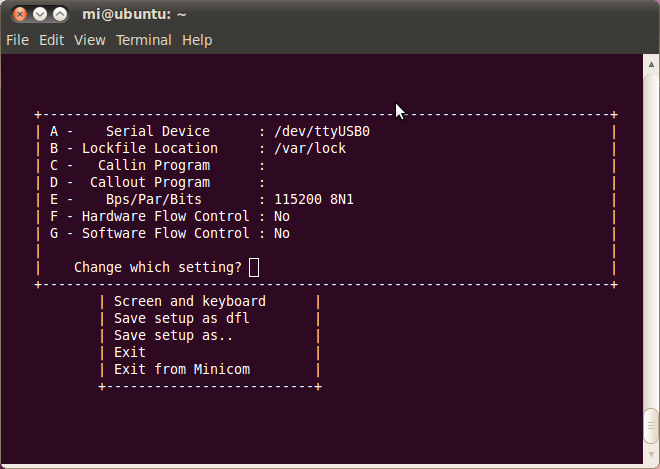
sudo minicom -sw
- Go to “Serial port setup” and edit as follow: Serial Device: /dev/ttyUSB0 (type a key) Hardware Flow Control: No (type f key) Software Flow Control: No (type g key)
-
Press exit and "Save setup as dfl"
-
Exit from Minicom
-
Let’s give proper access permissions to serial port with:
sudo chmod 666 /dev/ttyUSB0
- Now we can start listening with:
sudo minicom -w
- Power cycle UDOO DUAL/QUAD to see the boot process and connect it to serial console shell
Connecting via Serial from Mac
-
Download the serial adapter Driver here: http://www.silabs.com/products/mcu/pages/usbtouartbridgevcpdrivers.aspx
-
Connect the serial port of UDOO DUAL/QUAD (CN6) to your PC using the micro USB cable.
-
Download and install Serial Tools https://itunes.apple.com/it/app/serialtools/id611021963 or directly from the Apple Store
-
Open Serial Tools, and change the following parameters: Serial Port: “SLEB_USBtoUART” Baud rate “115200”

- Hit connect, and here you go!
