 UDOO Neo Documentation
Programming Arduino M4 from External PC
External Arduino IDE
Heads up!A microSD with a with UDOOBuntu2 have to be up and running to program the Arduino™ M4 from an external PC. Expecially the USB direct Connection(USB OTG Gadget) and the UDOO FOTA server are the software needed.
Heads up!For external programming the serial monitor doesn’t work yet.
Connect UDOO NEO
To use the External Arduino IDE follow the instructions below:
-
Connect UDOO NEO via Micro USB Cable to your PC
-
In order to use UDOO NEO'S USB Connection on Mac and Windows, you must install few drivers first as described in the USB Direct Connection.
Install UDOO FOTA
Heads up!NOTE: If you use UDOOBuntu2 BETA 5 or previous versions you need to install the UDOO FOTA (Firmware over the Air) Server Package while if you use UDOOBuntu2 BETA 6 or later versions skip this step.
- To Install the UDOO FOTA you need to connect the board to internet using it either as a Computer or a Headless Device:
- Once you board is connected to internet open a terminal and type:
sudo apt-get update
sudo apt-get install udoofota-server
Install and configure the Arduino IDE
-
From your computer go to the Arduino website and downlaod the last Arduino IDE version (currently 1.6.9): Arduino IDE 1.6.9
-
Select the OS you have in your computer and download the IDE then install it
-
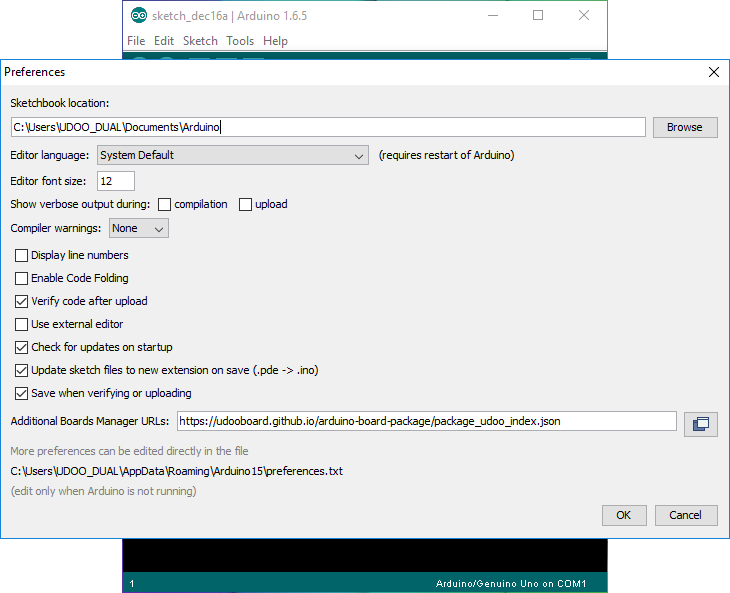
Open the IDE, go to
File -> Preferencesand add this link toAdditional Boards Manager URLsand then clickOK:https://udooboard.github.io/arduino-board-package/package_udoo_index.json
-
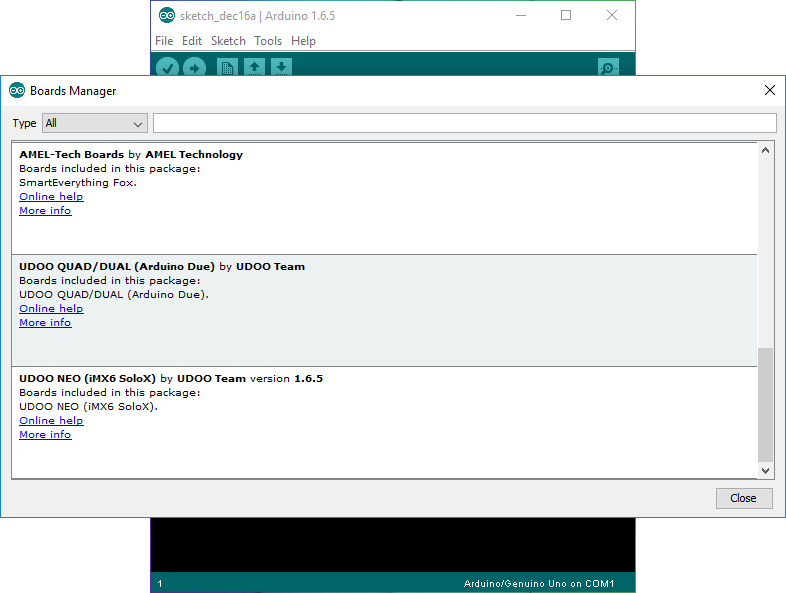
Go to
Tools -> Boardsand open theBoard Manager. -
Wait few seconds 'till the end of the "index download" then look for
UDOO NEO (iMX6 SoloX) by UDOO Teamand install it.
- Now in
Tools -> Boardsyou should see theUDOO NEO (Cortex M4), if so Click on it. Leave theTools -> Portsunselected.
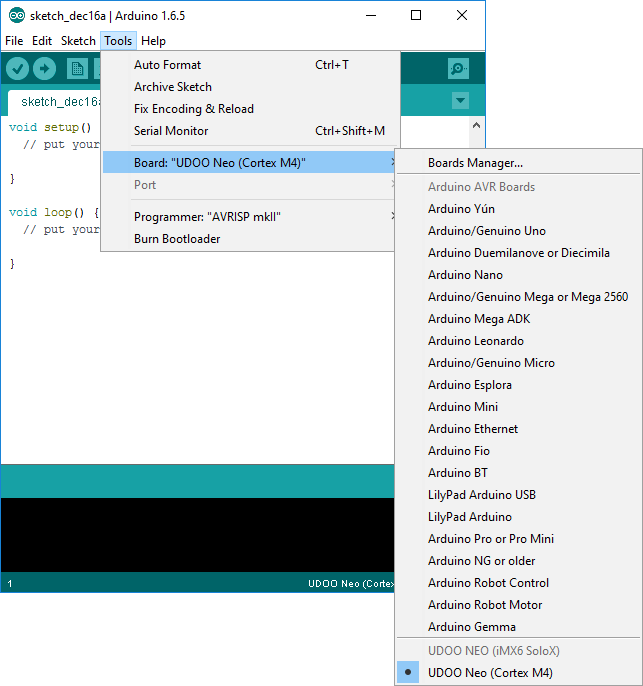
- Done, now you're ready to use your UDOO NEO with the Arduino IDE installed on your Computer as you usually do with a standard Arduino. Press the button
Uploadto load a sketch.
Heads up! In order to get it working on Linux 64bit you need compatibility packages:
$ sudo apt-get -y install lib32z1 lib32ncurses5 lib32bz2-1.0
Heads up! If you don't manage to install/update the Board Manager try to delete the Arduino IDE preferences folder.
If you are using the Windows App installed from the store this is the path:
C:\Users\<user_name>\Documents\ArduinoData\
If you are using the Desktop App installed withe the Windows installer this is the path:
C:\Users\<user_name>\AppData\Local\Arduino15\
/Users/<user_name>/Library/Arduino15/
/home/<user_name>/.arduino15/
Remote Serial Monitor
Now you can access the serial device ttyMCC from outside installing udoofota-serial package on your UDOO NEO
sudo apt update
sudo apt install udoofota-serial
In order to reach the internal serial between M4 and A9 from outside, you must connect to UDOO Neo TCP/IP serial socket (port 5151) and bind it to a virtual serial port. Depending on your OS, the procedure and the application to use may vary.
Download VirtualCommPort and install it. Then add COM99 and set host=<udooneo_ip>. You should be able to access the serial port through Arduino IDE Serial Monitor or a custom application.
Install socat from the official website or like described in here. Then open a terminal and run:
socat pty,link=path/to/newtty,raw,echo=0 tcp:<udooneo_ip>:5151
e.g:
socat pty,link=$HOME/mytty,raw,echo=0 tcp:192.168.7.2:5151
Download and install socat through your favorite package manager (e.g: apt install socat) and then open a terminal and run:
socat pty,link=path/to/newtty,raw,echo=0 tcp:<udooneo_ip>:5151
e.g:
socat pty,link=$HOME/mytty,raw,echo=0 tcp:192.168.7.2:5151
Upload a sketch over Network
You could also upload sketch Over Network from an external PC using the functionalities of the UDOO FOTA (Firmware over the Air) Server Package installed on the UDOObuntu 2 distro. You just need to know the IP Address of UDOO NEO and be in its same network. The Arduino Board Manager of UDOO NEO installs the udooclient in you external PC, this little tool interacts with the FOTA server running on the UDOO NEO.
You need to modify a file in your Arduino package that is named platform.txt. For example, in Arduino IDE 1.6.9 the file is located here:
If you are using the Windows App installed from the store this is the path:
C:\Users\<user_name>\Documents\ArduinoData\packages\UDOO\hardware\solox\<version_number>\platform.txt
If you are using the Desktop App installed withe the Windows installer this is the path:
C:\Users\<user_name>\AppData\Local\Arduino15\packages\UDOO\hardware\solox\<version_number>\platform.txt
/Users/<user_name>/Library/Arduino15/packages/UDOO/hardware/solox/<version_number>/platform.txt
/home/<user_name>/.arduino15/packages/UDOO/hardware/solox/<version_number>/platform.txt
<user_name> is your User Name. <version_number> is the board manager package number version, can change according to changes in our repositories.
At the end of platform.txt you'll find this row:
tools.udooclient.upload.pattern="{path}/{cmd}" "192.168.7.2:5152" "{build.path}/{build.project_name}.bin"
192.168.7.2 is the default Ip Address of the UDOO NEO when it is connected with the USB Direct Connection. To upload the sketch wirelessly you need to substitute the IP address in the string.
Substitute 192.168.7.2:5152 with [UDOO NEO's network IP address]:5152
Save the file, now you can upload a sketch without any cable clicking the Upload button of the Arduino IDE.
If you want you can also directly use the UDOO client to upload the binary without using the Arduino IDE.