 UDOO Neo Documentation
GPIO
GPIO
The GPIO (General-Purpose Input/Output) peripheral provides dedicated general-purpose pins that can be configured as either inputs or outputs. When configured as an output, it is possible to write to an internal register to control the state driven on the output pin. When configured as an input, it is possible to detect the state of the input by reading the state of an internal register. In addition, the GPIO peripheral can produce CORE interrupts. The GPIO is one of the blocks controlling the IOMUX of the chip.
More detailed information are available on the Chapter 30 of the iMX 6SoloX Reference Manual.
How to access GPIOs from Linux
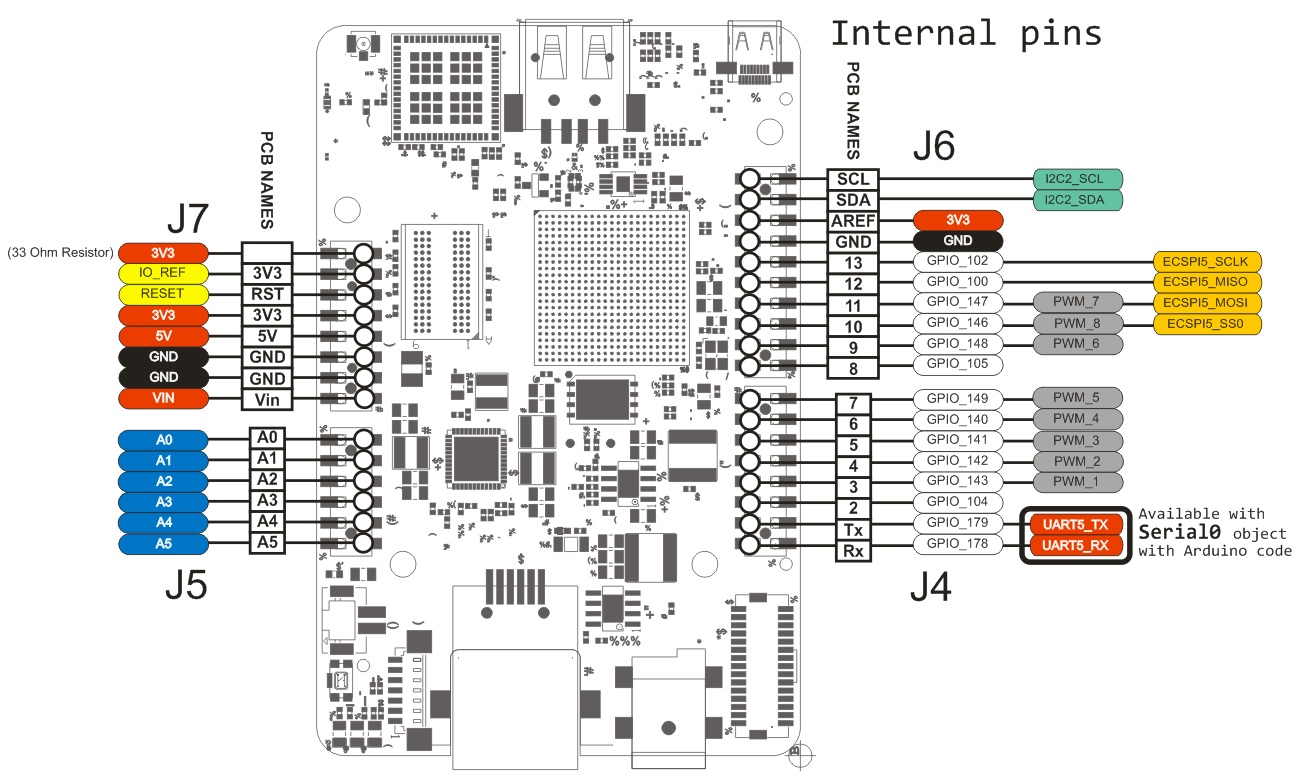
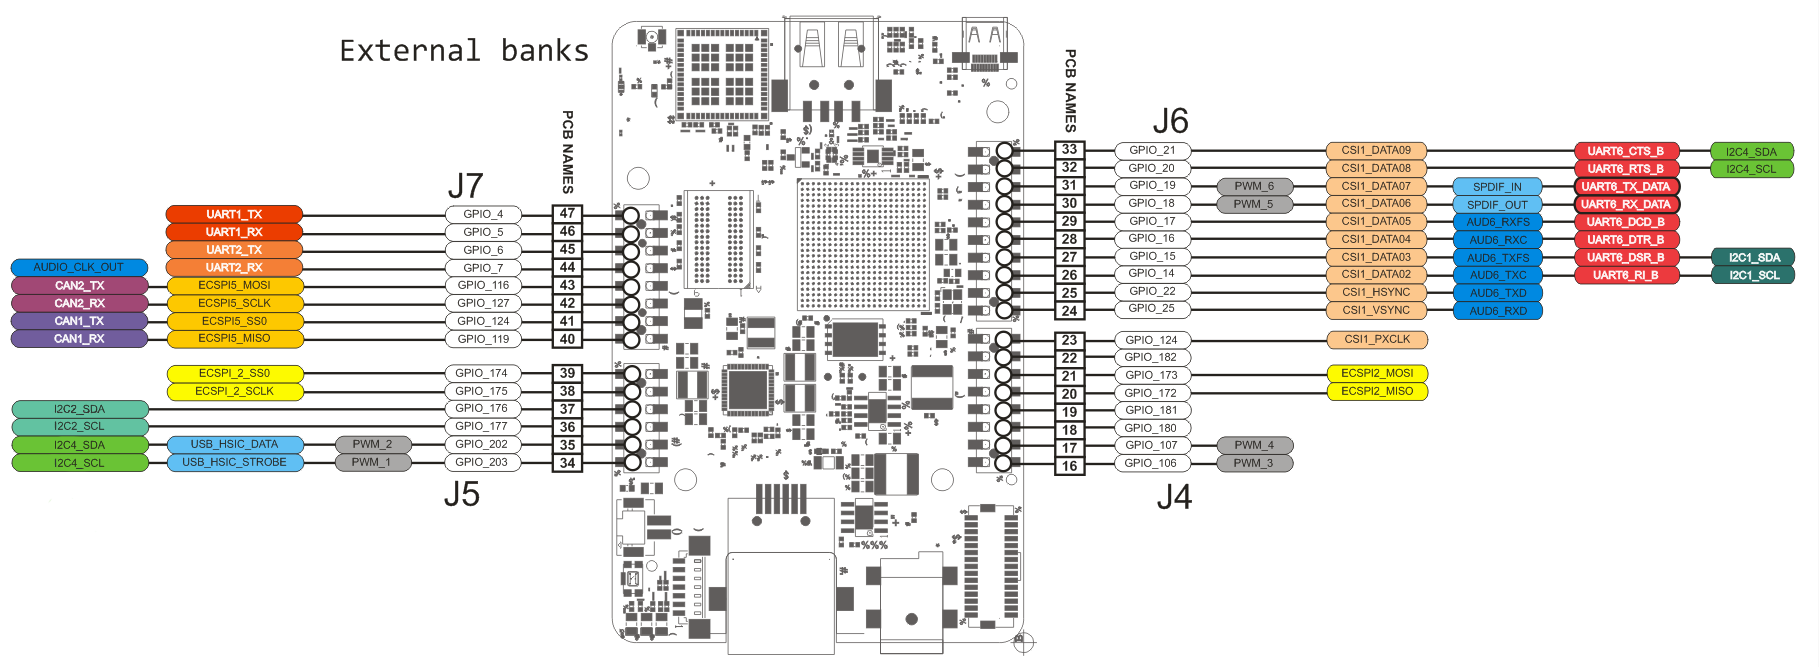
The GPIOs available from the Linux kernel are placed on the external pinout headers (in orange).

The internal pinout is assigned to the M4 core (blue pins), the external one to the A9 core.
Heads up! Disable the M4 core to give A9 control over the inner row (refer to this guide on how to do that).
Pinmuxing
Most of the pins are exported by default as GPIO; however the UDOO Neo CPU is able to assign more specialized tasks to the external pins. In the following two images it is reported a list of all the possible behaviours:
To change this configuration, please follow this guide.
Using GPIOs
By default (for safety reasons), all GPIOs are exported in input configuration. This means the board CPU can read the value of the voltage connected to the pins. The other possible configuration is output, which forces a pin to take a specific voltage.
Heads up! When using the output configuration, be sure to avoid short-circuits!
It is possible to switch a pin in input or output mode with the following commands:
# set pin 25 to input
echo in > /gpio/pin25/direction

# set pin 25 to output
echo out > /gpio/pin25/direction
To verify the voltage direction, just read the same file:
cat /gpio/pin25/direction
Write values
To write a low or high value on a GPIO, you need to write 0 or 1 in the value file:
# set GPIO 25 to low value - 0 volts
echo 0 > /gpio/pin25/value

# set GPIO 25 to high value - 3.3 volts
echo 1 > /gpio/pin25/value
In order to set the value, the GPIO must be in the out direction.
Read values
If the direction is set to in, it is possible to read the GPIO value reading the same file:
cat /gpio/pin25/value
If the direction is set to out and you try to read the value, is not guaranteed that the value is coherent with the voltage found on the external pinout.
Advanced usage
GPIO management is made simple by the udoo-gpio-export package, which comes preinstalled in UDOObuntu Linux. This package takes care of exporting all GPIOs in input mode, and creates the symlinks from the /sys/class/gpio entries to the /gpio directory.
If you want, you can directly use the /sys/class/gpio entries. For example, to export a GPIO use:
echo GPIO_NUMBER > /sys/class/gpio/export
Please note that GPIO_NUMBER is not the number written on the PCB. Instead, it is the number written in the round label close to the PCB number in the previous two images. For example, if you want to control the pin 24 (PCB name) you should read GPIO_25.
GPIO_NUMBER can be calculated with the following relation:
GPIO_NUMBER = ((BANK - 1) * 32 ) + ID
For example, if you want to export the GPIO1_IO_25;
# GPIO1_IO_25 means BANK=1 and ID=25
# GPIO_NUMBER = ((1 - 1) * 32 ) + 25 = 25
echo 25 > /sys/class/gpio/export