 UDOO Neo Documentation
Hall Sensor
Description
The Hall effect is the production of a voltage difference (the Hall voltage) across an electrical conductor, transverse to an electric current in the conductor and a magnetic field perpendicular to the current. It was discovered by Edwin Hall in 1879.
The Hall coefficient is defined as the ratio of the induced electric field to the product of the current density and the applied magnetic field. It is a characteristic of the material from which the conductor is made, since its value depends on the type, number, and properties of the charge carriers that constitute the current.
A good document explaining how this effect works is available here.
Tested devices
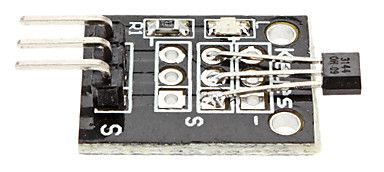
44E-938
A Hall generator is a solid state sensor which provides an output voltage when it detects magnetic flux. As implied by its name, this device relies on the Hall effect. The Hall effect is the development of a voltage across a sheet of conductor when current is flowing and the conductor is placed in a magnetic field.
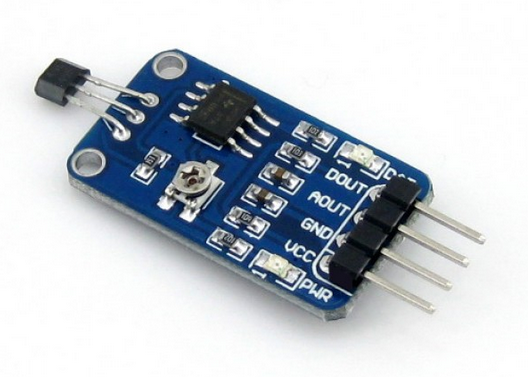
49E-416BG
49E Linear Hall-effect sensor is small, versatile linear Hall-effect device that is operated by the magnetic field from a permanent magnet or an electromagnet. The linear sourcing output voltage is set by the supply voltage and varies in proportion to the strength of the magnetic field. The integrated circuitry features low noise output, which makes it unnecessary to use external filtering. It also includes thin film resistors to provide increased temperature stability and accuracy. The linear Hall sensor has an operating temperature range of -40 °C to 85 °C appropriate for commercial, consumer and industrial environments.
Examples
int val = 0; // This holds the read value.
void setup(){
  pinMode(2, INPUT);   // Read the input on pin 2
  pinMode(13, OUTPUT); // I used pin 13 since it has an LED on the UNO built-in.
  Serial.begin(9600);  // I also wanted to confirm the value I read.
}

void loop(){
  val = digitalRead( 2 ); // Go read the pin.
  Serial.println(val);    // just to see on the serial monitor what I read.

  if ( val == HIGH )
    digitalWrite ( 13, LOW );  // Turn on the LED when the value is high.
  else
    digitalWrite ( 13, HIGH ); // Turn off the LED when the value is low.
}
After copying and uploading this code your LED should be off. Whenever a magnet approaches the sensor, it will allow the electricity to flow and the LED will turn on. If it doesn't work on the first time, try using a bigger and stronger magnet, it could make a difference. Also, the sensor is very sensitive to polarity, so try moving the magnet around it. And last, don't forget the reach isn't too big, so make sure that the magnet is close to the sensor.
int sensorPin = A5;    // select the input pin for the potentiometer
int ledPin = 13;      // select the pin for the LED
int sensorValue = 0;  // variable to store the value coming from the sensor

void setup() {
 pinMode(ledPin, OUTPUT);
  Serial.begin(9600);
}

void loop()
{
  sensorValue = analogRead(sensorPin);
  digitalWrite(ledPin, HIGH);
  delay(sensorValue);
  digitalWrite(ledPin, LOW);
  delay(sensorValue);
  Serial.println(sensorValue, DEC);
}
const int ledPin = 13;
const int A0Pin = A0;
#define D0Pin 8

void setup()
{
  pinMode(ledPin,OUTPUT);
  pinMode(D0Pin, INPUT);
}

void loop()
{
  int analogVal = analogRead(A0Pin);
  int digitalVal = digitalRead(D0Pin);
  Serial.print(analogVal);
  Serial.print("analog: ");
  Serial.print("  digital: ");
  Serial.println(digitalVal);
}